
How to Remove Background Noise from Podcast Audio: Pro Tips
Podcasting has become a powerful way to share stories, ideas, and information. But nothing ruins a great podcast episode faster than distracting background noise. Whether it’s traffic outside, air conditioning hum, or a neighbor’s dog barking, unwanted sounds can make your podcast feel unprofessional and hard to follow.
Many beginners think removing noise is complicated, but with the right tools and strategies, you can make your audio clean and clear. This guide will show you how to remove background noise from podcast audio, step by step, so your listeners stay focused on your voice and message.
Why Background Noise Matters In Podcasting
Listeners expect podcasts to sound crisp and easy to understand. Background noise can distract, confuse, or even annoy your audience. According to a study by Edison Research, over 70% of podcast listeners say audio quality is “very important” in their decision to keep listening. Even small noises can make your show seem less trustworthy or less professional.
When your podcast has clean audio:
- People understand your message more easily.
- Your episodes sound more professional.
- Listeners are more likely to share and recommend your podcast.
On the other hand, noisy audio:
- Makes editing harder and slower.
- Reduces listener engagement.
- Hurts your reputation and growth.
Most podcasters face noise issues, especially when recording from home or public spaces. Learning to remove background noise is not only about fixing mistakes—it’s about making your podcast stand out.
Common Sources Of Podcast Background Noise
Before you can fix noise, you need to know where it comes from. Here are the most frequent sources:
- Room sounds: Air conditioners, fans, refrigerators, clocks, and computers.
- Outdoor noises: Cars, birds, sirens, construction, or wind.
- Electronic interference: Buzzes or hums from cables, phones, or poorly shielded equipment.
- People: Footsteps, chair squeaks, coughing, talking in the background.
- Recording errors: Unwanted echoes, mic handling noise, or poor microphone placement.
Sometimes, noises are obvious. Other times, you only notice them after recording. The good news is, most background noise can be reduced or removed—even if you didn’t catch it during recording.
Preparing For Clean Podcast Recording
The best way to handle background noise is to avoid it from the start. Here’s how you can prepare:
- Choose a quiet space: Pick a room away from street traffic and noisy appliances.
- Turn off machines: Switch off fans, air conditioners, or anything that makes a steady hum.
- Check for leaks: Close windows and doors to block outside sounds.
- Use soft materials: Carpets, curtains, and cushions absorb sound and reduce echo.
- Position your microphone: Place it close to your mouth, away from walls and noisy objects.
- Test before recording: Record a short sample and listen for any noise.
Many podcasters overlook room setup. But a good recording space can save hours of editing later.
Tips For Recording Remotely
Remote podcasting introduces new challenges. If your guest is in a noisy area, ask them to:
- Wear headphones to prevent audio feedback.
- Use a good quality microphone instead of a built-in laptop mic.
- Record in a small room with soft furnishings.
Remote podcasts often have more background noise, so encourage guests to prepare their space.
Essential Podcast Equipment For Noise Reduction
Choosing the right gear makes a big difference. Here are some tools to help:
Microphones
The microphone is your first defense against noise. Popular options include:
- Dynamic microphones (like Shure SM7B): Good at rejecting unwanted sounds, ideal for noisy spaces.
- Condenser microphones (like Audio-Technica AT2020): Capture more detail but are sensitive to room noise.
Dynamic mics are best for beginners in less controlled environments.
Audio Interfaces
An audio interface connects your microphone to your computer and often has built-in preamps. Good interfaces reduce hiss and electronic noise.
Headphones
Use closed-back headphones when recording and editing to hear unwanted sounds clearly.
Cables And Accessories
Choose balanced cables (XLR) to avoid hums and interference. Use pop filters to reduce mouth noises.
Noise Reduction Tools
Some microphones and interfaces come with built-in filters. For example:
- High-pass filters remove low-frequency hums.
- Noise gates block sounds below a certain volume.
These tools help prevent noise before it enters your recording.
Software Solutions For Removing Background Noise
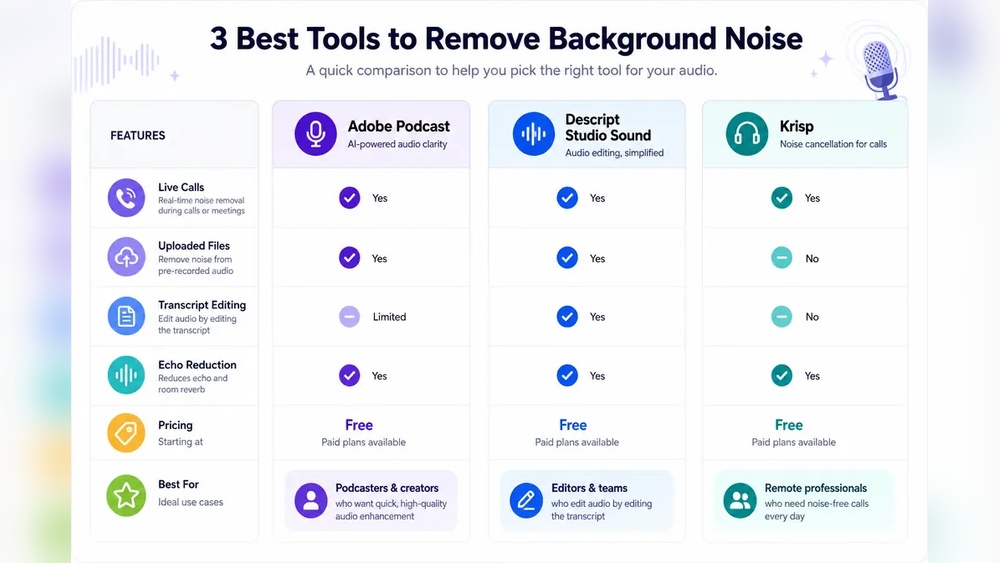
If noise sneaks into your recording, don’t worry. Several software tools can help. Let’s compare popular options:
| Software | Price | Noise Removal Features | Ease of Use |
|---|---|---|---|
| Audacity | Free | Noise reduction, spectral editing | Beginner-friendly |
| Adobe Audition | $20.99/month | Adaptive noise reduction, DeNoise, spectral repair | Professional, steeper learning curve |
| iZotope RX | $129 and up | Advanced noise removal, AI repair, voice isolation | Professional, requires training |
| GarageBand | Free (Mac) | Basic noise gate, EQ | Simple, limited features |
| Descript | $15/month | Studio Sound, AI enhancement | Very easy, automated |
Audacity is a favorite for beginners. It’s free and offers strong noise reduction. Adobe Audition and iZotope RX are used by professionals for deeper repair. Descript uses AI to clean audio automatically.
Using Audacity For Noise Removal
Audacity’s noise reduction tool is simple:
- Open your audio file.
- Select a few seconds of “noise only” (no talking).
- Click “Effect” > “Noise Reduction” > “Get Noise Profile”.
- Select your whole track.
- Return to “Noise Reduction” and set the amount (start with default settings).
- Click “OK” and listen.
Repeat if needed, but don’t overdo it—too much can make voices sound strange.
Using Adobe Audition
Adobe Audition offers more control:
- Use “Adaptive Noise Reduction” for changing noises.
- Try “DeNoise” for steady hums.
- The spectral repair tool lets you remove noises visually.
It’s best for podcasters who want precise editing.
Using Izotope Rx
iZotope RX is the industry standard for heavy noise problems:
- “Voice De-noise” removes hiss and hum.
- “Spectral Repair” can erase single noises like coughs or clicks.
- “Dialogue Isolate” separates voice from background.
It’s more expensive but powerful for tough audio issues.
Using Descript
Descript’s “Studio Sound” feature uses AI:
- Upload your audio.
- Turn on Studio Sound.
- The software automatically cleans and enhances your track.
It’s easy for beginners and works well for remote interviews.
Step-by-step Guide: Removing Background Noise From Podcast Audio
Let’s walk through the noise removal process using Audacity, since it’s free and widely used.
Step 1: Import Your Audio
Open Audacity and import your podcast recording.
Step 2: Find A Noise Sample
Look for a section where nobody is speaking—just background noise. Select this part.
Step 3: Get The Noise Profile
Go to the “Effect” menu, choose “Noise Reduction”, then click “Get Noise Profile”. Audacity now understands the noise you want to remove.
Step 4: Select Your Whole Track
Highlight your entire audio track.
Step 5: Apply Noise Reduction
Open “Noise Reduction” again. Adjust settings if needed:
- Noise Reduction (dB): How much noise to remove (start at 12 dB).
- Sensitivity: How sensitive the tool is to changes (start at 6.00).
- Frequency Smoothing: How smooth the result is (start at 3).
Click “OK”.
Step 6: Listen And Fine-tune
Play your audio. If it sounds unnatural, undo and try lower settings. Sometimes, two gentle passes work better than one strong pass.
Step 7: Remove Isolated Noises
For loud bumps or clicks, zoom in and use Audacity’s “Repair” tool or delete the noise manually.
Step 8: Export Your Clean Audio
When satisfied, export your podcast as a WAV or MP3 file.
Step 9: Final Quality Check
Always listen to your final export with headphones. Make sure voices sound natural and the background is quiet.
Using Eq And Filters To Reduce Noise
Noise removal tools fix big problems, but EQ (equalization) and filters can help clean up the rest.
High-pass Filters
A high-pass filter cuts out low-frequency noises like rumble or air conditioning. Set the filter at 80 Hz or 100 Hz—voices aren’t affected, but hum disappears.
Low-pass Filters
A low-pass filter removes high-frequency hiss or electronic noise. Set at 16 kHz for spoken voice.
Notch Filters
Use a notch filter to remove specific frequencies—like a 60 Hz electrical hum.
Practical Eq Steps
- Open your audio editor’s EQ tool.
- Find problem frequencies by listening for hum, hiss, or harshness.
- Cut those frequencies gently (don’t remove too much).
EQ helps polish your audio after noise removal.
Advanced Tools: Ai And Plugins
New AI-powered plugins make noise removal easier and smarter.
| Plugin | Price | Features | Compatibility |
|---|---|---|---|
| Waves NS1 | $99 | Automatic noise suppression | Works in most audio editors |
| Accusonus ERA Bundle | $149 | Noise remover, voice leveler | Windows, Mac, most DAWs |
| iZotope RX Elements | $129 | Voice de-noise, click remover | Pro Tools, Audacity, others |
These plugins often use a single knob or slider. Beginners can get clean audio without learning complex settings. AI tools are especially useful for podcasts with guests or noisy environments.

Credit: www.waveroom.com
Mistakes To Avoid When Removing Noise
Many podcasters make mistakes that hurt their audio quality. Here are some to watch out for:
- Over-processing: Removing too much noise can make voices sound metallic or robotic.
- Ignoring the source: Trying to fix bad recordings instead of improving recording conditions.
- Using cheap microphones: Low-quality mics add hiss and hum.
- Skipping headphone checks: You may miss noises if you only listen on speakers.
- Not saving backups: Always keep your original files in case something goes wrong.
A common beginner mistake is using strong noise reduction settings. Always start gentle, listen, and adjust.
Real-life Examples: Podcast Noise Fixes
Let’s look at how podcasters solve noise problems:
- Case 1: City Apartment Recording
- Problem: Sirens and traffic during interviews.
- Solution: Used a dynamic microphone, closed windows, added thick curtains, and applied gentle noise reduction in Audacity.
- Case 2: Remote Guest with Laptop Mic
- Problem: Fan noise and echo.
- Solution: Asked guest to move to a carpeted room, use headphones, and record a “noise profile” for editing. Used Descript’s AI Studio Sound to clean up audio.
- Case 3: Electrical Hum
- Problem: 60 Hz hum from audio interface.
- Solution: Switched to balanced cables, used notch filter in Adobe Audition to remove hum, and replaced faulty cable.
These examples show how preparation and editing can solve most noise issues.
Practical Tips For Better Podcast Audio
Here are actionable tips to keep your podcast audio clean:
- Record at high quality: Use 48 kHz sample rate and 24-bit depth for more editing flexibility.
- Keep background noise low: Record early mornings or late nights when it’s quieter.
- Speak close to the mic: Reduces room sound and echo.
- Use pop filters and foam windscreens: Stops mouth noises and softens harsh sounds.
- Monitor during recording: Wear headphones to catch problems in real time.
- Save multiple versions: Always keep backups before and after editing.
Many podcasters miss tip #6—backups prevent disaster if editing goes wrong.
Comparing Manual Vs Automatic Noise Removal
Manual editing gives you control, but takes time. Automatic tools are faster, but less precise.
| Method | Pros | Cons | Best For |
|---|---|---|---|
| Manual (e.g. Audacity) | Precise, customizable | Time-consuming, needs skill | Podcasters who want full control |
| Automatic (e.g. Descript) | Fast, easy | Sometimes removes too much, less flexible | Beginners, remote podcasts |
For most podcasters, a mix of both works best: use automatic tools for quick cleanup, then manual editing for problem spots.
How To Remove Noise From Multiple Tracks
Many podcasts have more than one speaker. Here’s how to handle noise with multiple tracks:
- Edit tracks separately: Apply noise reduction to each speaker’s track.
- Match background levels: Use EQ to make tracks sound similar.
- Use crossfades: Smooth transitions between tracks to avoid sudden changes in background noise.
- Check group effects: Some plugins let you clean all tracks at once, but test to avoid losing voice quality.
Always listen to your final mix with headphones—background noise can sneak in during editing.
Saving And Exporting Clean Podcast Audio
When your audio is clean, export with the right settings:
- WAV format: Best for editing and archiving (uncompressed).
- MP3 format: Best for publishing (compressed, smaller size).
- Bitrate: Use 128 kbps or higher for spoken voice.
Don’t forget to check your podcast host’s requirements before uploading.
Non-obvious Insights For Beginners
Here are two insights many beginners miss:
- Noise profiles change: If you record at different times or locations, background noise will be different. Always capture a new noise sample for each episode.
- Editing is easier with short segments: Instead of cleaning a whole hour at once, break your audio into sections. This way, you can use different settings for each part.
These tricks save time and improve quality—most podcasters only discover them after years of trial and error.
When To Hire A Professional Editor
Sometimes, noise problems are too complex for home editing. Consider hiring a professional if:
- Your podcast is for business or has sponsors.
- You record in very noisy environments.
- You want to focus on content, not technical editing.
Professional editors use advanced tools and can fix issues you might miss. Prices vary, but expect to pay $30-$100 per episode for editing.

Credit: www.youtube.com
Where To Learn More
If you want to dive deeper into audio editing, check out Podcast Insights for tutorials, gear reviews, and editing advice.
Frequently Asked Questions
How Do I Remove Background Noise From My Podcast For Free?
You can use Audacity, a free audio editor. Import your recording, select a noise-only segment, get the noise profile, and apply noise reduction to your whole track. Adjust settings for best results.
What Is The Best Software For Podcast Noise Removal?
Popular options include Audacity (free), Adobe Audition, and iZotope RX. For beginners, Audacity is easy and effective. For advanced users, iZotope RX offers powerful tools.
Can Background Noise Be Removed Completely?
Most noise can be greatly reduced, but not always removed 100%. Strong noise reduction can hurt voice quality. It’s best to record in a quiet place and use editing to clean the rest.
How Can I Prevent Background Noise Before Recording?
Choose a quiet room, turn off machines, use soft materials, and position your microphone close to your mouth. Test your setup and listen for noise before recording.
Should I Use Automatic Or Manual Noise Removal?
Automatic tools are fast and easy, but manual editing gives more control and better results. For most podcasters, a mix of both works well.
A clean podcast is easier to listen to, share, and grow. With the right preparation, gear, and editing, you can remove background noise and deliver professional-quality audio every time. Even beginners can master these skills with practice and patience. Your audience will notice the difference—and your podcast will sound its best.

Credit: www.youtube.com


About author








Add comment